User Guide
Hello! I Am Watson!
Can I use Watson?
Watson is a desktop application that supports Apple, Windows and Linux operating systems. As long as you have a computer, you can run Watson!
Using This Guide
This guide covers all of Watson’s features and how to use them. If you are unsure of how to use a feature or find help about a problem you might be facing, you can refer to this guide.
Table of Contents
- Quick Start
- How to navigate Watson
- A Brief Guide to Commands
- Handling Student Particulars
- Handling Grades
- Handling Attendance
- Utility Features
- Frequently Asked Questions
- Glossary
Quick Start
-
Ensure you have Java
11or above installed in your Computer (Not sure how? Check out this guide). -
Download the latest version of Watson from here. The file you want is called
Watson.jar. -
Locate the downloaded file. Often, this would be your computer’s
Downloadsfolder. -
On your computer’s Desktop, create a new folder called
Watson, then drag and dropWatson.jarfrom yourDownloadsfolder into theWatsonfolder. -
Double-click on
Watson.jarto start the application.
Watson: The Basics
The Login Page
When you open Watson, you will be greeted with the login page, which looks like this:

The login page is where you can log into Watson. To log in, type your login details into their respective boxes, then click the “Login” button below.
The Main Page
After logging in, you will be greeted with the main page, which looks like this:

This looks quite complicated! But don’t worry, we’ll go through each part of the main page one by one.
You can use the following table to navigate through the components in the main page:
The Menu Bar
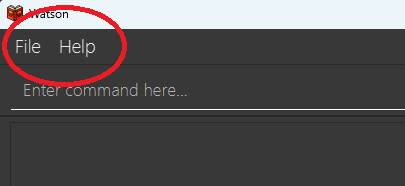
The menu bar is located at the top of the main page. It contains the following options:
The File tab

Clicking on the File tab will open a dropdown menu with the “Exit” option. Clicking on the “Exit” option will close the application.
The Help tab

Clicking on the Help tab will open a dropdown menu with the “Help” option. Clicking on the “Help” option will open a help window that looks like this:

The “Copy URL” button will copy the link to the user guide, which can be pasted in your browser to open the online user guide.
The Command Box
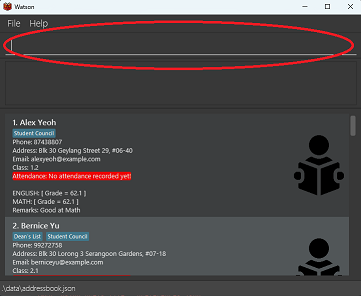
The command box (circled in red above) is where you can type in commands to Watson. After you type in your desired command, press the “Enter” key on your keyboard to tell Watson to perform the action.
The Results Display
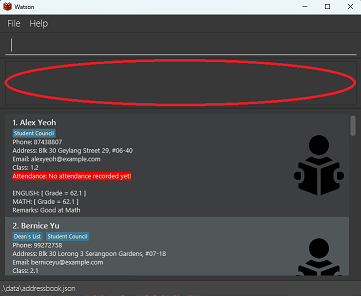
The results display (circled in red above) is where Watson provides feedback after the entering of commands. If a command is executed successfully, a success message will be shown. If a command is not successfully executed, an error message will be shown and a help message may also be present to help you correct the error.
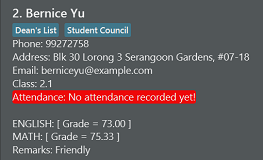
The Student Card

Each student is represented by a card that looks like the image above. From top to bottom, the card contains the following details:
Name (Alex Yeoh)
The name of the student. Notice that there is a “1.” before the name;
this represents the student’s index. You will use this number in certain commands
such as edit and delete.
Tags (“Student Council”)
A student can have one, multiple or no tags. Tags are a good way to represent special roles a student might have (in this case, Alex is a member of the Student Council).
Phone Number (87438807)
The phone number of the student.
Address (Blk 30 Geylang Street 29, #06-40)
The address of the student.
Email (alexyeoh@example.com)
The email address of the student.
Class (1.2)
The class of the student. Watson supports many formats for classes, such as “1.2”, “1A” and more.
Attendance (1/1)
The attendance of the student. This is represented in the form “number/number”, where the first number represents the number of classes the student has attended, while the second number represents the total number of classes that have taken place.
Subjects (English, Math)
The subjects that the student is taking. Each subject is represented in its own line, and contains information about the student’s grades for that subject. “ENGLISH: [ Grade = 62.1 ]” means that the student has obtained 62.1% of the maximum grade possible for English so far.
For example, if the student has taken 1 test that has a weightage of 30% of the subject’s entire grade, and scored 100% for that test, then the number shown in the application would be 30% of 100%, or 30%.
Remarks (Good at Math)
Remarks are a good way to keep track of a student’s strengths and weaknesses. A student can have multiple remarks.
A Brief Guide to Commands
The Command Structure
Commands are the main way you can interact with Watson. You can type commands into the command box to tell Watson to perform actions.
Commands are made of a command word and arguments. The command word is the first word you type into the command box, and it tells Watson what action to perform.
For example, if you type add into the command box, Watson will know that you want to add a student.
The arguments are the rest of the words you type into the command box, and are usually made up of different parameters.
Think of the command structure as ordering a sandwich. The command word is the type of bread you want, while the parameters are the ingredients you want.
Let’s break down an example command:
add n/John Doe p/98765432
The command word. This tells Watson that you want to add a student.
The name parameter. This tells Watson that the name of the student is “John Doe”.
The phone number parameter. This tells Watson that the phone number of the student is “98765432”.
Important Notes
Commands have some special features that you should be aware of!
Words in UPPER_CASE are the inputs to be supplied by the user.
For example, in add n/NAME, you will give your own value for NAME. An example would be add n/John Doe.
Items in square brackets are optional.
For example, TAG in n/NAME [t/TAG] can be excluded.
You can match the format with either n/John Doe t/friend or n/John Doe.
Items with … after them can be used any number of times, including zero times.
For example, [t/TAG]… can be ignored (used 0 times), t/friend (used 1 time), t/friend t/family (used 2 times) etc.
Parameters can be in any order.
For example, if the command specifies n/NAME p/PHONE_NUMBER, p/PHONE_NUMBER n/NAME is also acceptable.
Repeated parameters will be ignored.
Only the last occurrence of the repeated parameter will be taken.
For example, if you specify n/Alice n/Bob, only n/Bob will be taken by Watson.
Handling Student Particulars
Watson’s main capabilities are to keep track of students’ particulars, such as their name, phone number, email address, etc. With Watson, you can move away from cumbersome pen-and-paper systems and keep track of your student’s data far more easily.
Watson currently supports four features regarding student particulars:
Adding a student
You can add a student to Watson by using the add command.
Command Word: add
Compulsory Parameters: n/NAME, p/PHONE, e/EMAIL, a/ADDRESS,
c/CLASS
Optional Parameters: [rem/REMARK]…, [t/TAG]…
Parameter Information
- None of the parameters can be blank.
-
NAMEshould only contain alphanumeric characters and spaces. -
PHONEshould only contain numbers, and it should be at least 3 digits long. -
EMAILshould be a valid email address. -
CLASSshould only contain numbers, letters and the decimal point.
Examples
add n/Johnson Doe p/98765432 e/johnson@gmail.com a/2 Sengkang Avenue c/1A t/Student Council
add n/Amy Lee a/Changi Airport p/87878787 e/amy@outlook.com c/1.4 rem/Good at Math
Step-By-Step Example
Let’s use add n/Johnson Doe p/98765432 e/johnson@gmail.com a/2 Sengkang Avenue c/1A t/Student Council and see how the
process of adding a Student works!
1) Type in the command add followed by the parameters, then press Enter on your keyboard.
You should see that a Student Card has been created for “Johnson” at the end of the list in
Watson, with the parameters added as details below his name.
2) The Results Display should also show a success message saying that Johnson Doe has been
added into Watson.
Problem: I typed in the command, but Watson says that the student already exists? Solution: Ensure that the student that you want to add does not share the same _name_, _phone number_ or _email address_ as another student in the application.
Editing a student
You can edit a student’s particulars by using the edit command.
The edit command supports the editing of the following particulars:
- Name
- Phone number
- Email address
- Address
- Class
- Remarks
- Tags
Multiple fields can be edited with a single edit command.
Command Word: edit
Compulsory Parameters: INDEX, AT LEAST ONE of the Optional Parameters
Optional Parameters: [n/NAME], [p/PHONE],
[e/EMAIL], [a/ADDRESS], [c/CLASS, [rem/REMARK]…, [t/TAG]…
Parameter Information
- None of the parameters can be blank.
-
INDEXis the number of the student that you want to edit. This number is shown next to the student’s name. -
NAMEshould only contain alphanumeric characters and spaces. -
PHONEshould only contain numbers, and it should be at least 3 digits long. -
EMAILshould be a valid email address. -
CLASSshould only contain numbers, letters and the decimal point.
Examples
edit 1 n/John Doe p/98765432
edit 2 t/Financial Assistance
Step-By-Step Example
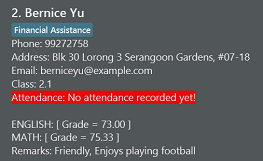
Let’s use edit 2 t/Financial Assistance and see how the editing process works!
1) Type in the command edit followed by the parameters, then press Enter on your keyboard.
You should see that the Student Card for the second student in the list has been updated with the
new tag.
2) The Results Display should also show a success message saying that the second student has
been edited.
Deleting a student
You may delete the entry for a particular student with the delete command.
Note that this action is irreversible!
Command Word: delete
Compulsory Parameters: INDEX
Parameter Information
-
INDEXis the number of the student that you want to delete. This number is shown next to the student’s name.
Examples
delete 1
Step-By-Step Example
Let’s use delete 1 and see how the deleting process works!
1) Type in the command delete followed by the parameters, then press Enter on your keyboard.
You should see that the Student Card for the first student in the list has been deleted from
Watson.
2) The Results Display should also show a success message saying that the first student has
been deleted.
Adding a remark to a student
You can add a remark to a student with the remark command.
Command Word: remark
Compulsory Parameters: INDEX, REMARK
Parameter Information
- None of the parameters can be blank.
-
INDEXis the number of the student that you want to add a remark to. This number is shown next to the student’s name. -
REMARKis the remark that you want to add to the student.
Examples
remark 1 Good at Math
remark 2 Enjoys playing football
Step-By-Step Example
Let’s use remark 2 Enjoys playing football and see how the add remark process works!
1) Type in the command remark followed by the parameters, then press Enter on your keyboard.
You should see that the Student Card for the second student in the list has been updated with an
additional remark “Enjoys playing football”.
2) The Results Display should also show a success message saying that the remark has been added
for the second student.
Handling Grades
Watson allows you to keep track of your students’ grades in a simple and intuitive manner. Watson also features a novel prediction system that allows you to predict a student’s grade for a future assessment.
Watson currently supports two features regarding student grades:
Grading your Students
Watson’s grading system allows you to grade all your students at once for any assessment.
Command Word: grade
Compulsory Parameters: subject_, assessmentName_,
assessmentTotalScore_, assessmentWeightage_, assessmentDifficulty
Parameter Information
- This command has a special parameter format, using underscores
("_")instead of prefixes("n/"). - There should be no spaces between parameters.
- The parameters have to be in the exact order as shown above.
-
subject_is the subject that the assessment belongs to. It must be in CAPITAL LETTERS. If no students take the subject, an error message will be shown. -
assessmentName_is the name of the assessment. This name should be unique for the subject, and can only consist of alphabets and numbers. Spaces are NOT allowed. -
assessmentTotalScore_is the total score of the assessment. This should be a positive whole number (no decimals!). -
assessmentWeightage_is the weightage of the assessment. This should be a decimal number between 0 and 1 (e.g. 0.5). This is the percentage of the total grade that this assessment contributes to; so 0.5 would represent 50%. -
assessmentDifficultyis the difficulty of the assessment. This should be a decimal number between 0 and 5 (e.g. 3.5). The difficulty of the assessment should be a rough estimate (according to you!) of how difficult the assessment is.
Examples
grade MATH_Quiz1_10_0.5_3.5
grade ENGLISH_FYE_100_0.5_4.5
Step-By-Step Example
Let’s use grade ENGLISH_FYE_100_0.5_4.5 and see how the grading process works!
1) Type in the command grade followed by the parameters.
You should see the following screen:
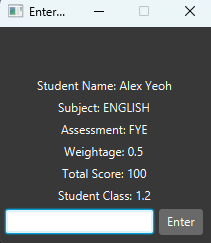
Observe that there is a text box at the bottom of the window, next to which is a button labelled Enter.
2) Type in the grade that the student obtained for the assessment. The window will now show the details of the next student to be marked. Continue typing in marks until the window closes.
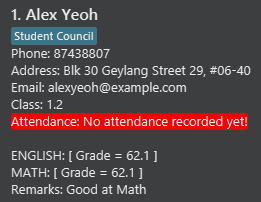
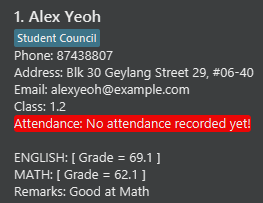
3) Once the window closes, you will observe that the grades of the students marked
will be updated.
Predicting a Student’s grade
Watson’s prediction system allows you to predict a student’s grade for a future assessment. Watson follows the following steps to predict a student’s grade:
1) Calculate the percentage of classes attended by the student. Let’s call this the student’s learning rating.
For each of the student’s previous assessments, perform the following procedure:
1.1. Take the difficulty of the assessment, then apply the following formula:
Let’s call this number the difficulty bonus.
1.2. Add the difficulty bonus to the student’s grade for the assessment. We call this their normalized score. 2) Take the average of the student’s normalized scores for all their previous assessments, then add the difficulty of the assessment to predict. This is the final prediction!
Command Word: predict
Compulsory Parameters: n/NAME, s/SUBJECT, diff/DIFFICULTY,
Parameter Information
- None of the parameters can be blank.
- The
n/NAMEparameter should match EXACTLY to the student to be predicted. - The student should be studying the subject to be predicted.
- The
diff/DIFFICULTYparameter should be a decimal number between 0 and 5 (e.g. 3.5).
Examples
predict n/Alex Yeoh s/ENGLISH diff/4.0
predict n/Bernice Yu s/MATH diff/3.5
Step-By-Step Example
Let’s use predict n/Alex Yeoh s/ENGLISH diff/4.0 and see how the prediction process works!
1) Type in the command predict followed by the parameters, then press Enter.
2) You should see the following screen:

This prediction means that Alex is likely to get about 62 percent for their next English assessment.
Handling Attendance
Watson allows you to mark attendance for your students and keep track of them easily.
Watson currently has one feature regarding student attendance:
Marking attendance for your Students
Watson’s mark attendance command allows you to mark attendance for all your students in a class for a particular day in a single command.
Command Word: markAtt
Compulsory Parameters: d/DATE, c/CLASS,
ind/INDEX NUMBERS OF EVERYONE PRESENT
Parameter Information
- All parameters cannot be blank.
- INDEX NUMBERS refer to the number displayed beside each student’s name in Watson.
- Multiple index numbers can be added after the prefix “ind/”.
- If all students from the class are absent, type ‘0’ for the “INDEX NUMBERS” field, ie “markAtt d/DATE c/CLASS ind/0”.
Examples
markAtt d/5/6/2022 c/1.2 ind/5
markAtt d/7/11/2022 c/1.2 ind/2 3 5 8 9 10
Step-By-Step Example
Let’s use markAtt d/7/11/2022 c/1.2 ind/2 3 5 8 9 10 and see how the attendance process works!
1) Type in the command markAtt followed by the parameters, then press Enter on your keyboard.
2) You should see in the results display section below the command box that attendance for the index numbers specified
in class 1.2 have been marked as present, and the remaining students have been marked as absent.
3) Individual attendance for each student should have been updated too.
Utility Features
Watson has a few utility features that can make handling your students easier, including:
- Sorting Students
- Finding a Student
- Viewing all Students
- Clearing the list of Students
Sorting Students
Watson’s sorting system allows you to sort your students based of their grades for a given subject.
Command Word: sort
Compulsory Parameters: asc OR desc, s/SUBJECT
Parameter Information
- The
ascparameter sorts the students in ascending order, while thedescparameter sorts the students in descending order. - The
s/SUBJECTparameter should be the subject to be sorted by.
Examples
sort asc s/ENGLISH
sort desc s/MATH
Step-By-Step Example
Let’s use sort asc s/ENGLISH and see how the sorting process works!
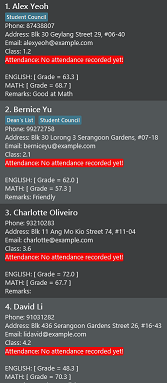
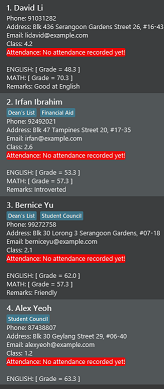
1) Type in the command sort asc s/ENGLISH, then press Enter. Note that ENGLISH does
not need to be capitalized.
2) You should see the following screen:
Finding a Student
Watson’s find system allows you to find a student based on their name, class or a subject.
Command Word: find
Compulsory Parameters: AT LEAST ONE OF n/NAME OR c/CLASS OR s/SUBJECT
Parameter Information
- You may put use multiple parameters to search for a student, but NOT zero.
- The parameters work independently; for example, if you search for the name
Alex Yeohand the class4A, ALL students with the nameAlex YeohAND the class4Awill be displayed.
Examples
find n/Alex Yeoh
find n/Alex c/4A
find n/Alex s/ENGLISH
Step-By-Step Example
We will use the command find n/Alex c/2.1 to search for students.
1) Type in the command find n/Alex c/2.1, then press Enter.
2) You should observe that two students have been found: Alex Yeoh (whose name matches the search term “Alex”),
and Bernice Yu (who is in class 2.1).
3) To get back to the main list, type list in the command box, then press Enter.
Viewing all Students
You can easily navigate back to the full student list with the list command.
Command Word: list
Examples
list
Clearing the list of Students
You can clear the list of students with the clear command.
Note that this is irreversible!
Command Word: clear
Examples
clear
Getting Help
If you need help, you can type help in the command box, then press Enter.
A pop-up window will appear with a link that you can copy and paste into your browser.
The link will bring you to this guide!
Command Word: help
Examples
help
Frequently Asked Questions
Q: How do I check my Java version?
A: Open Terminal if you’re on Mac or Command Prompt if you’re on Windows. Type “java -version” and press Enter.
Q: How do I install Java 11?
A: Download Java 11 to your computer via this link.
Q: What if the app does not open when I double-click it?
A: Uninstall the application and reinstall the application again.
Q: How do I transfer my data to another Computer?
A:
1) Install the app in the other computer
2) Delete the empty data file that the new app create. The empty data file should be found in the same folder that
the app was installed in.
3) Copy and paste the data file with all your previous data into the folder containing the newly installed app. That
data file should be found in the folder of your previous Watson app.
Glossary
- Operating System: The software that runs on your computer.